
Week 8:
3D printing samples
We are going to use 3D printing in seeed studio for our baby bottle prototype. These 3D printing samples in the picture are used to test the tensile strength and the dynamic thermal properties of the 3D printing material whose name is vero white. 
Real bottles
We are going to use polypropylene for real bottle mass production. Because the temperature sensor decide the temperature of the milk by accepting infrared signal. So the infrared property of Polypropylene container is studied. Following are the FTIR spectrums of the polypropylene container and the vero white prototype material.

FTIR for Polypropylene

FTIR for 3D printing vero white
For polypropylene used in container, there is a strong absorption peak around 3000cm-1 which will maybe influence the function of temperature sensor. For the prototype material the absorption peaks are more and stronger.
We are going to buy some baby bottles and study the FTIR spectrum of the materials used for real baby bottle.
Week 7:
Per Altium ad astra…
This week’s tasks? Finish the PCB schematics, do a full market analysis, present a first complete CAD model and come up with the software/firmware structure… Easy.
PCB layout:
PCB layout
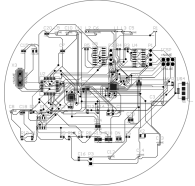
“The backbone of every great PCB design is the tools and talent of the designer” it is written on Altium’s homepage. Well, the tools were there and now we had one week to do something about the lack of talent. And again, we did it! Here we especially want to thank Alessandro Crespi, who gave a short introduction on PCB design for his project group and allowed us to also come and have a look. Long story short: We now have something that looks like a PCB. If it works is the big question, and we hope that we can answer that with some test-prints soon.

Our first PCB schematics – click to get a bigger version!
Market analysis: Our very own market analyst calculated that there are approximately 200’000 parents in Switzerland who could be susceptible to our product! So far so good, now there is the question: How do we reach them? And if we reach them, what profit can we make with our bottle? Manufacturing costs should soon be quite easy to calculate, as the PCB design is more or less ready in terms of components and size. So we’ll keep you updated on these questions!
Design: Our industrial designer and mechanical engineer worked together to create a bottle that does not only look incredibly nice (if we may say so) but is also functional already! The screw mechanism is implemented, so that the bottle can easily be attached to the sensor part and PCB as well as sensors now fit into the bottom part nicely!

3D CAD cut through our bottle
Software: Our mechanical engineer is now building his transversal skills in programming and has already done a nice job with some flow charts and diagrams! But because of our huge workload this week we can not yet present you a software prototype. We will keep you updated!
Week 6:
To the Lab!
All the components arrived and we were able to do some testing!
- 0-500g load cell and INA125 Instrumentation amplifier: Everything works great and is easy to connect! We just followed the instructions on seeedstudio’s wiki page and connected the output to our Arduino Uno analog input and we had a ready-to-go scale! Next steps here: Calibration and physical integration into the device.
- TMP007 IR Sensor vs. DS18B20 Digital temperature sensor: Both of these sensors come with an extraordinary easy-to-use Arduino library and are even easier to connect than the load cell because thanks to the internal math engine of the TMP007 and internal conversion of the DS18B20 no amplification is needed. Neat features of these devices are that the TMP007 is an IR sensor and can therefore work fully contactless and the DS18B20 can run on “parasite power” from the data line only, which makes it really interesting for low power applications! We will see after some testing which one makes the race!
- The Grove ADXL335 works out-of-the-box as well! Again, seeedstudios wiki helped us to set up everything in no time. And the open-source nature of the breakout board will make it easy to implement this accelerometer into our application!
- RedBearLab’s BLE shield for Arduino is in charge of our Bluetooth transmissions. Their github and homepage provided us with everything to set up a connection to our phone and we were already able to read some of the values directly from our Android device instead of just looking at the serial terminal! Next steps here: Program our own Android app and try to understand the quite complex schematics so that we can implement the nRF8001 chip in our PCB!
Here are some images of our Lab work this week:


We want to thank Madame Chantal Doré for allowing us to use the Lab space! This made our work this week a whole lot easier.
Week 5:
Recharging our batteries

Milestone 1 done – but who needs sleep anyway?
After the milestone last week we had a “forced” short break this week. We ordered all our components an were waiting for them until the first package arrived on Friday of this week. The second one will hopefully arrive early next week.
But waiting does not mean sitting around and doing nothing, that’s not an option with our tight timetable! Our engineers went out to look for supervisors for our project and they found them! As the project goes on we will maybe have time to introduce them and describe their role a little further, but the important part for now is that each member of the group should be able to deliver a final report that respects our university’s guidelines with the help of our supervisors.
We also found a workplace in one of EPFL’s electronic laboratories where we can start to put together our components next week! ELB217 will hopefully be the base for many productive and successful engineering sessions!
Other than that we are currently evaluating the feedback of Alex and Marc as well as the feedback we got from our field studies. And again, this means that we are questioning our design a lot and try to improve it more and more. As always, if you have ideas and comments feel free to post them below, or contact us directly via our homepage:
http://www.fimi-babybottle.com/
Week 4:
Let’s do it: Roadmap to first milestone
This week we did some wrap-up of all the work we have done so far. You can check out our whole presentation on the front-page of this blog (here). But here are some of the key points so far:
Field study: We have spoken to a lot of different people that could possibly come into contact with our product. We got some valuable insight in existing solutions and consumer behavior by speaking to the vendors and the manager of a Baby Shop in Lausanne. We also got some insight from talking to nurses at the CHUV and to people at a day nursery, which actually told us that some function that let’s you have a small diary of the baby’s day could be beneficial. And apparently baby bottles with a 30 degree neck don’t really hold what they promise (being anti-colic), so we could also profit from a design point of view! Other good news: We could distribute some questionnaries via the nursery daycare and should soon have some first-hand responses from the parents!
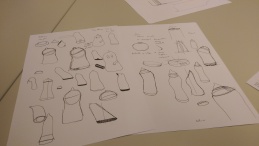
Design: A lot has been going on since our last update. For the field study Arthur made some 3D sketches to show people how our bottle could potentially look like. Here they are:

First 3D sketches of how our bottle could look like!
And of course these sketches did not just fall from the sky. There’s some hard work and several design ideas behind them. So if you are interested in what a designer does before he/she can present nice pictures like the ones above, here you go:

If you read our blog closely, you have already seen some of these!
Electrical engineering: For the first milestone it would be nice to have a first list of components that we can order to begin with testing. So after checking out different solutions for which microcontroller corresponds best to our needs we decided to take one that’s “en vogue” at the moment: The Arduino Uno. If you don’t know it, you can look it up here: Arduino
The main reasons for our choice are the Open Source nature of the development board and the vast amount of libraries that exist for the Arduino. If there is a sensor, there is almost sure also a library for Arduino for it!

The Arduino Uno board

Block diagram with the ATmega328 in the centre
All the components are ready to order and are compatible with the Arduino Board. We will keep you posted about them as soon as they arrive! If you want to know already more or less what we order check the Block Diagram above.
Materials: For the materials we still have some difficult choices ahead. Do we want to build a smart valve or is it too complicated? We actually found some existing patents and solutions that could help us:

Sketches of a possible smart valve
Another possibility is that we look for an anti-bacterial bottle material and do some tests on that instead of implementing the smart valve. This seems reasonable and a bit more realistic. But we will keep you posted!
Software: Check out our presentation for details about a possible first App design! We will first use Android Studio and the associated SDK to get the Bluetooth working and implement statistics, a “How to prepare a Baby Bottle” Tutorial and the above mentioned “Baby diary”. Maybe in a second step we will also try an iOS App.
Last but not least, we now also have our own site (for marketing reasons). Check it out at: http://www.fimi-babybottle.com/
Week 3:
Gather all the information!
![x-all-the-things-template[1]](https://chic2015.files.wordpress.com/2015/02/x-all-the-things-template1.png)
We are currently working on all fronts to get as many facts about our preliminary solutions as possible:
Weight sensing: If you ever wondered what the inside of a kitchen scale looks like, here is a great video on the function and use of a strain gauge: https://www.youtube.com/watch?v=fPzUtzFJFus
Smart valve: We found that SMA, which is short for “Shape Memory Alloy” could maybe be a solution for our smart valve. This material will “remember” its initial position and go back to it after being bent, as soon as it reaches a certain temperature. Surely an exciting material to work with. But could it be a bit too fancy for a baby bottle? We will find out!
Mechanical design: We are currently bringing together mechanical engineering and industrial design to come up with the first drafts for the connection between all of the pieces. Come back soon for some first images!
Market analysis: Market analysis, customer surveys, business model. There is a lot to do to find out how much our baby bottle should cost and how we can actually sell it. We are sure that parents could benefit from our product, but we need to understand the market. If you want to help us out, just leave a reply on this blog about what you think about our baby bottle or fill out the survey that can be found on this page very soon!
Week 2:
Baby bottles: The one design to please them all!
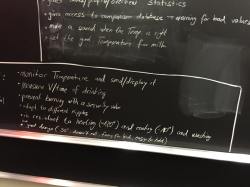
It’s design-time! Over the weekend we have collected a lot of possible solutions and designs for our bottle! And with possibilities there come always more questions: How can we monitor temperature and volume of the milk? How exact do the measurements have to be? What shape is easy to clean, easy to handle and hopefully appreciated by babies? How can we integrate our sensors into the bottle and make it still machine-washable and microwave-proof? (attention: microwaving your baby bottle is not best practice, but for some people this is the way to warm it up!)
After evaluating a lot of possible sensors for liquid level measurements, from capacitive, pressure sensors, optical sensors over ultrasound and resistive methods we have decided to take a closer look at simple force sensors. These would allow us to integrate the sensor into the bottom part only, which we could then easily detach for machine washing of the bottle…
Another question: Can we make use of “smart” materials to open and close our security valve or do we rather go for a mechanical solution? This will be another one of the questions that we want to answer until Friday!

Only Design and Material science united…
… can find the optimal baby bottle!
Week 1:
Brainstorming session for our product’s Value Proposition
After a long evening our team came up with the first draft of our VP: We want to help parents to get a better understanding of their baby’s needs by monitoring its eating habits. By connecting our bottle to their smartphone they will be able to see if their baby has eaten enough today, and they can compare their baby’s values to those of other babies around the world!
A temperature sensor will furthermore assist parents in heating the milk up just to the right temperature and a security valve prevents the baby from drinking from the bottle when the milk inside is still too hot!
All in all: Plenty of challenges for Design, Business, Material Science, Mechanical Engineering and Electronics! And we are excited to get this project going!

Many ideas on our VP…
…and a first product description!

Pingback: CHIC 2015 – 2nd milestone | China Hardware Innovation Camp